Quick Start
This chapter will guide users to quickly start using Neuron to collect data simulating Modbus equipment and upload the data to MQTT Broker, taking Modbus TCP driver protocol as an example.
Install Neuron
Neuron provides a variety of installation methods, and users can view the detailed installation methods in Installation. This example adopts containerized deployment mode, so as to start experiencing Neuron as soon as possible.
Get Docker image
$ docker pull emqx/neuron:latestRun the Docker container
$ docker run -d --name neuron -p 7000:7000 --privileged=true --restart=always emqx/neuron:latestInstall Modbus Simulator
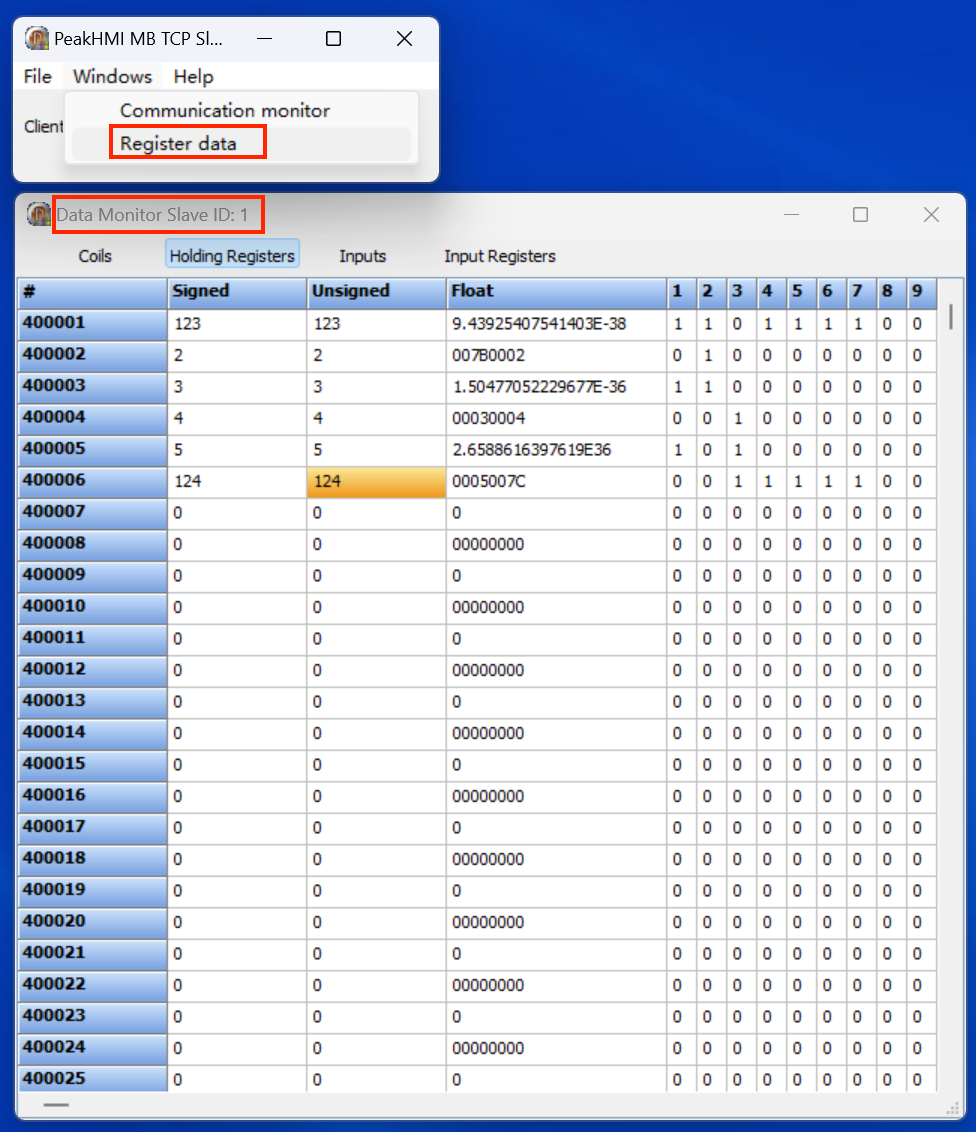
Install PeakHMI Slave Simulators software.
After installation, run Modbus TCP slave EX. Set the simulator salve ID and tag value, as shown in the figure below.
TIP
Neuron and the simulator must be run on the same LAN.
Try to turn off the firewall in Windows, otherwise Neuron may not connect to the simulator.
Quick Using Neuron
Access the Neuron gateway management console, open a web browser and enter the address and port number of the gateway running Neuron (http://x.x.x.x:7000). Replace "x.x.x.x" with the actual IP address of the gateway where Neuron is installed.
Login
Log in with the initial username and password:
- Username:
admin - Password:
0000
Add a Southbound Device
In Neuron, southbound refers to the connection between Neuron and devices. This step illustrates how to create a southbound device.
Select South Devices from the Configuration menu to enter the southbound device management interface, and click Add Device to add devices, as shown in the figure below.
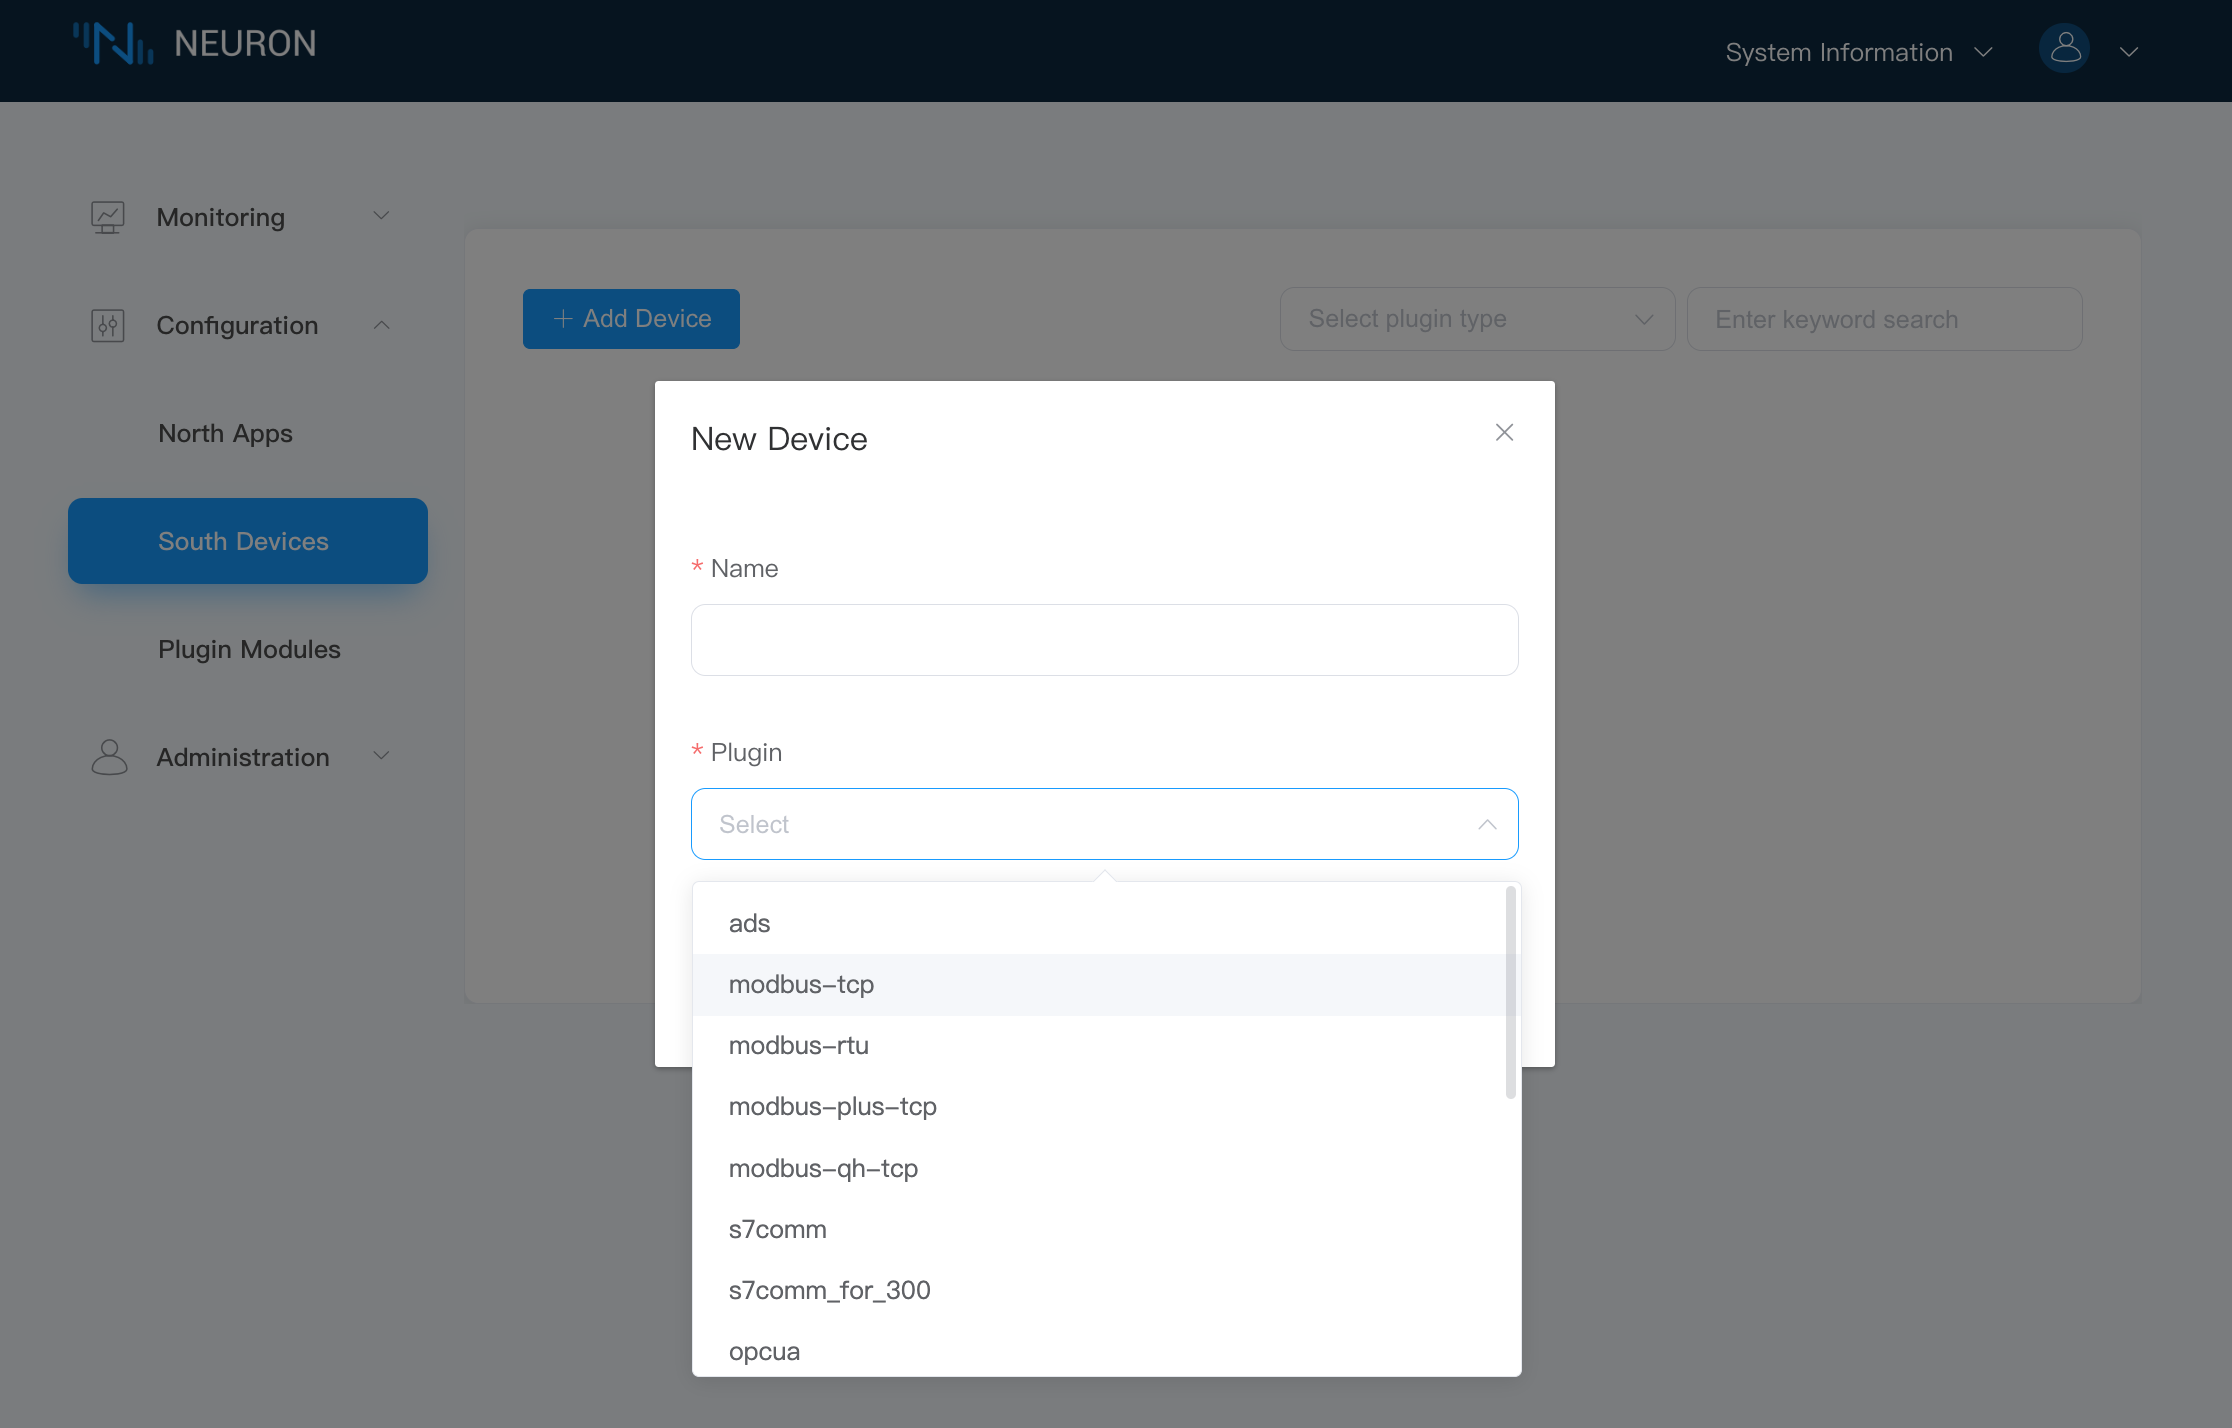
Add a new southbound device:
- Name: fill in the name of the device, such as "modbus-tcp-1";
- Plugin: select the plugin of modbus-tcp from the drop-down box;
- Click the Create button to add a new device.
Connect the Device to Neuron
Set Device Address
Configure the parameters required for Neuron to establish a connection with the device.
Click the Device Configuration icon on the southbound device card to enter the Device configuration interface, as shown in the figure below.
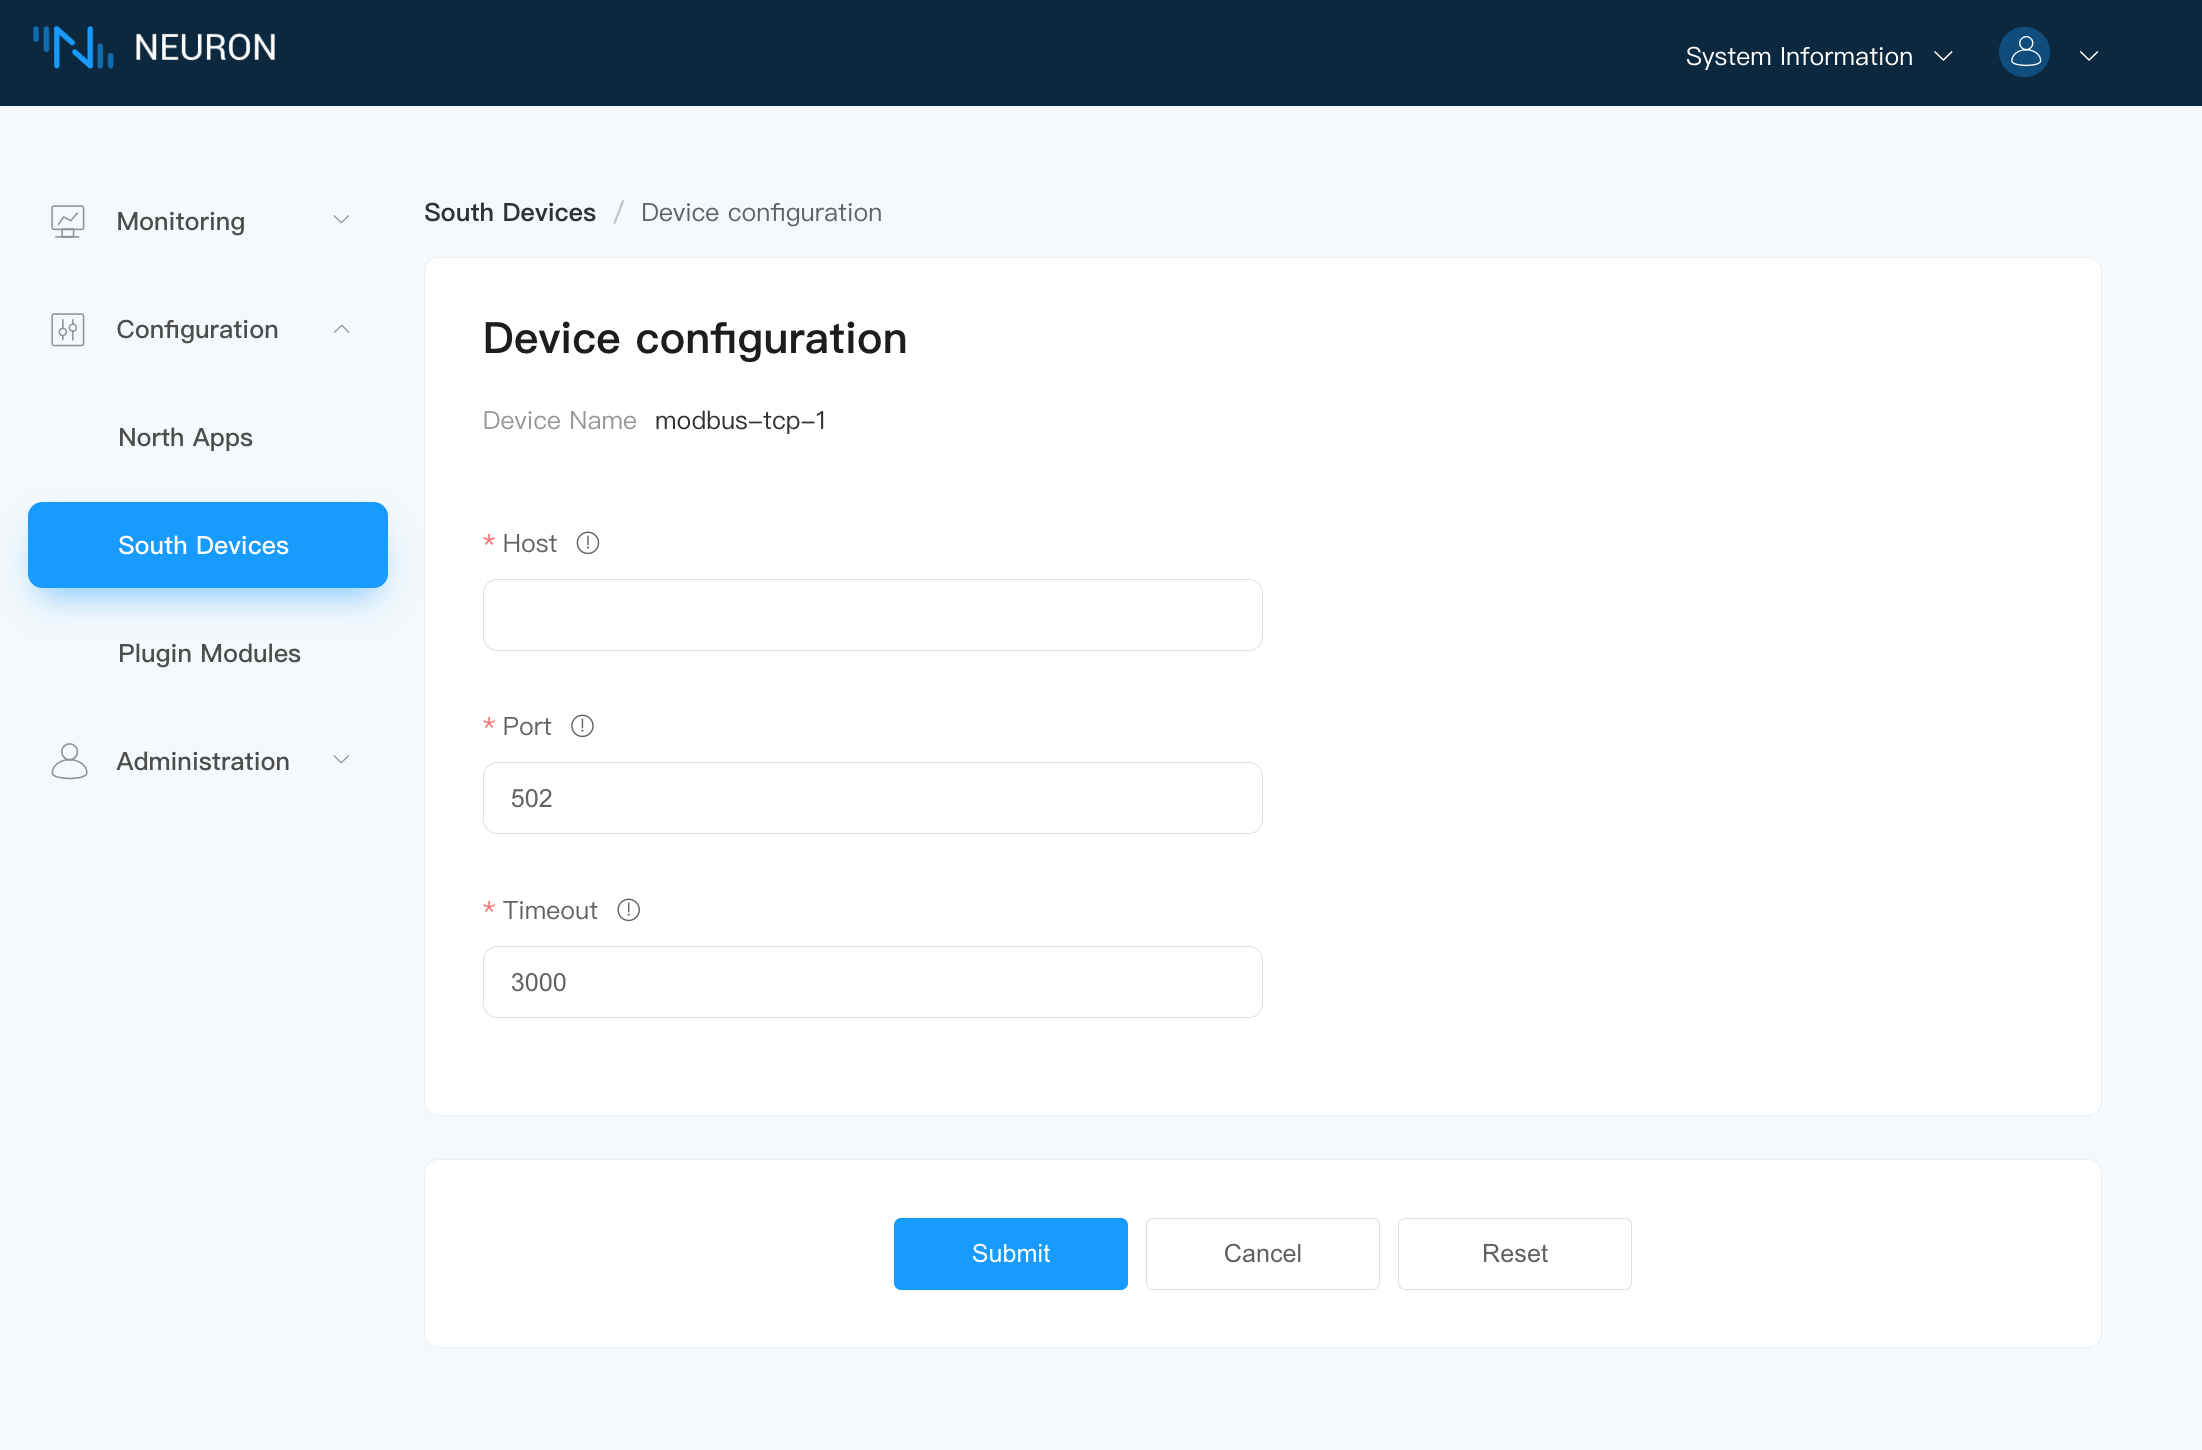
- Host: fill in the IP of the PC where PeakHMI Slave Simulators software is installed.
- For Port and Timeout, you can keep the default value.
- Click Submit to complete the equipment configuration, and the equipment card will automatically enter the working state of Running;
TIP
The configuration parameters required by each device are different. Please refer to Configuration for detailed description of southbound device parameters.
Add Tags for Data Communication
Before adding tags, you should first create a group for the device to facilate tag management.
Create a Group
Click any blank space in the device card to enter the Group List management interface, and click Create to open the Create Group dialog box, as shown in the following figure.
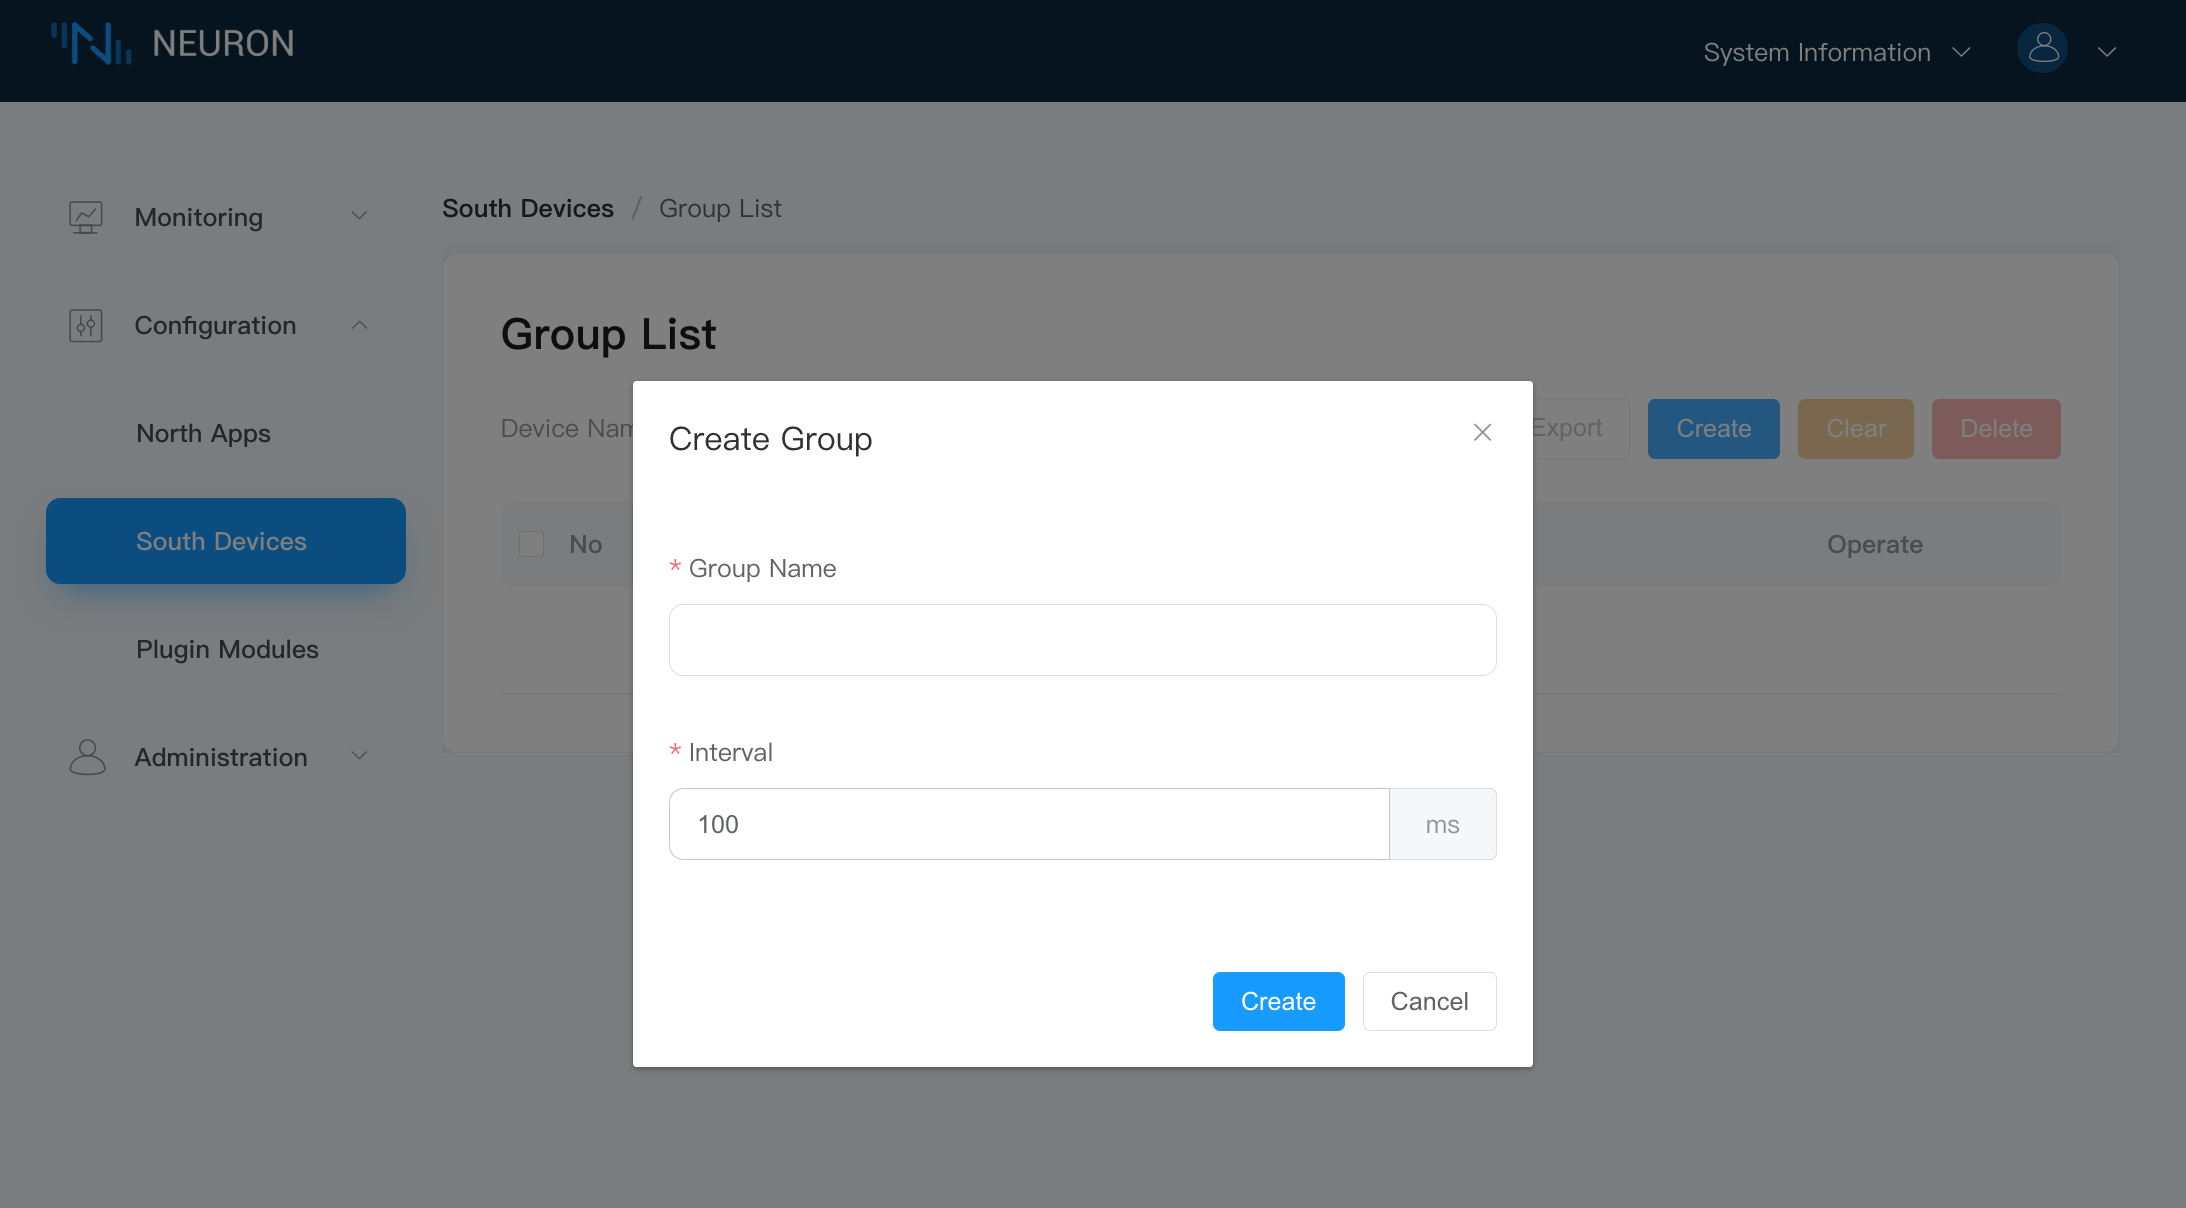
Create a group for the device:
- Group Name: Fill in the name of the group, such as group-1.
- Interval: Keep the default value.
- Click Create to complete the creation of the group.
Add Tags
Add the device tags to be collected, including tag address, tag attribute, tag type, etc.
Click the Tag List icon in the group to enter the tag list management interface, as shown in the figure below.
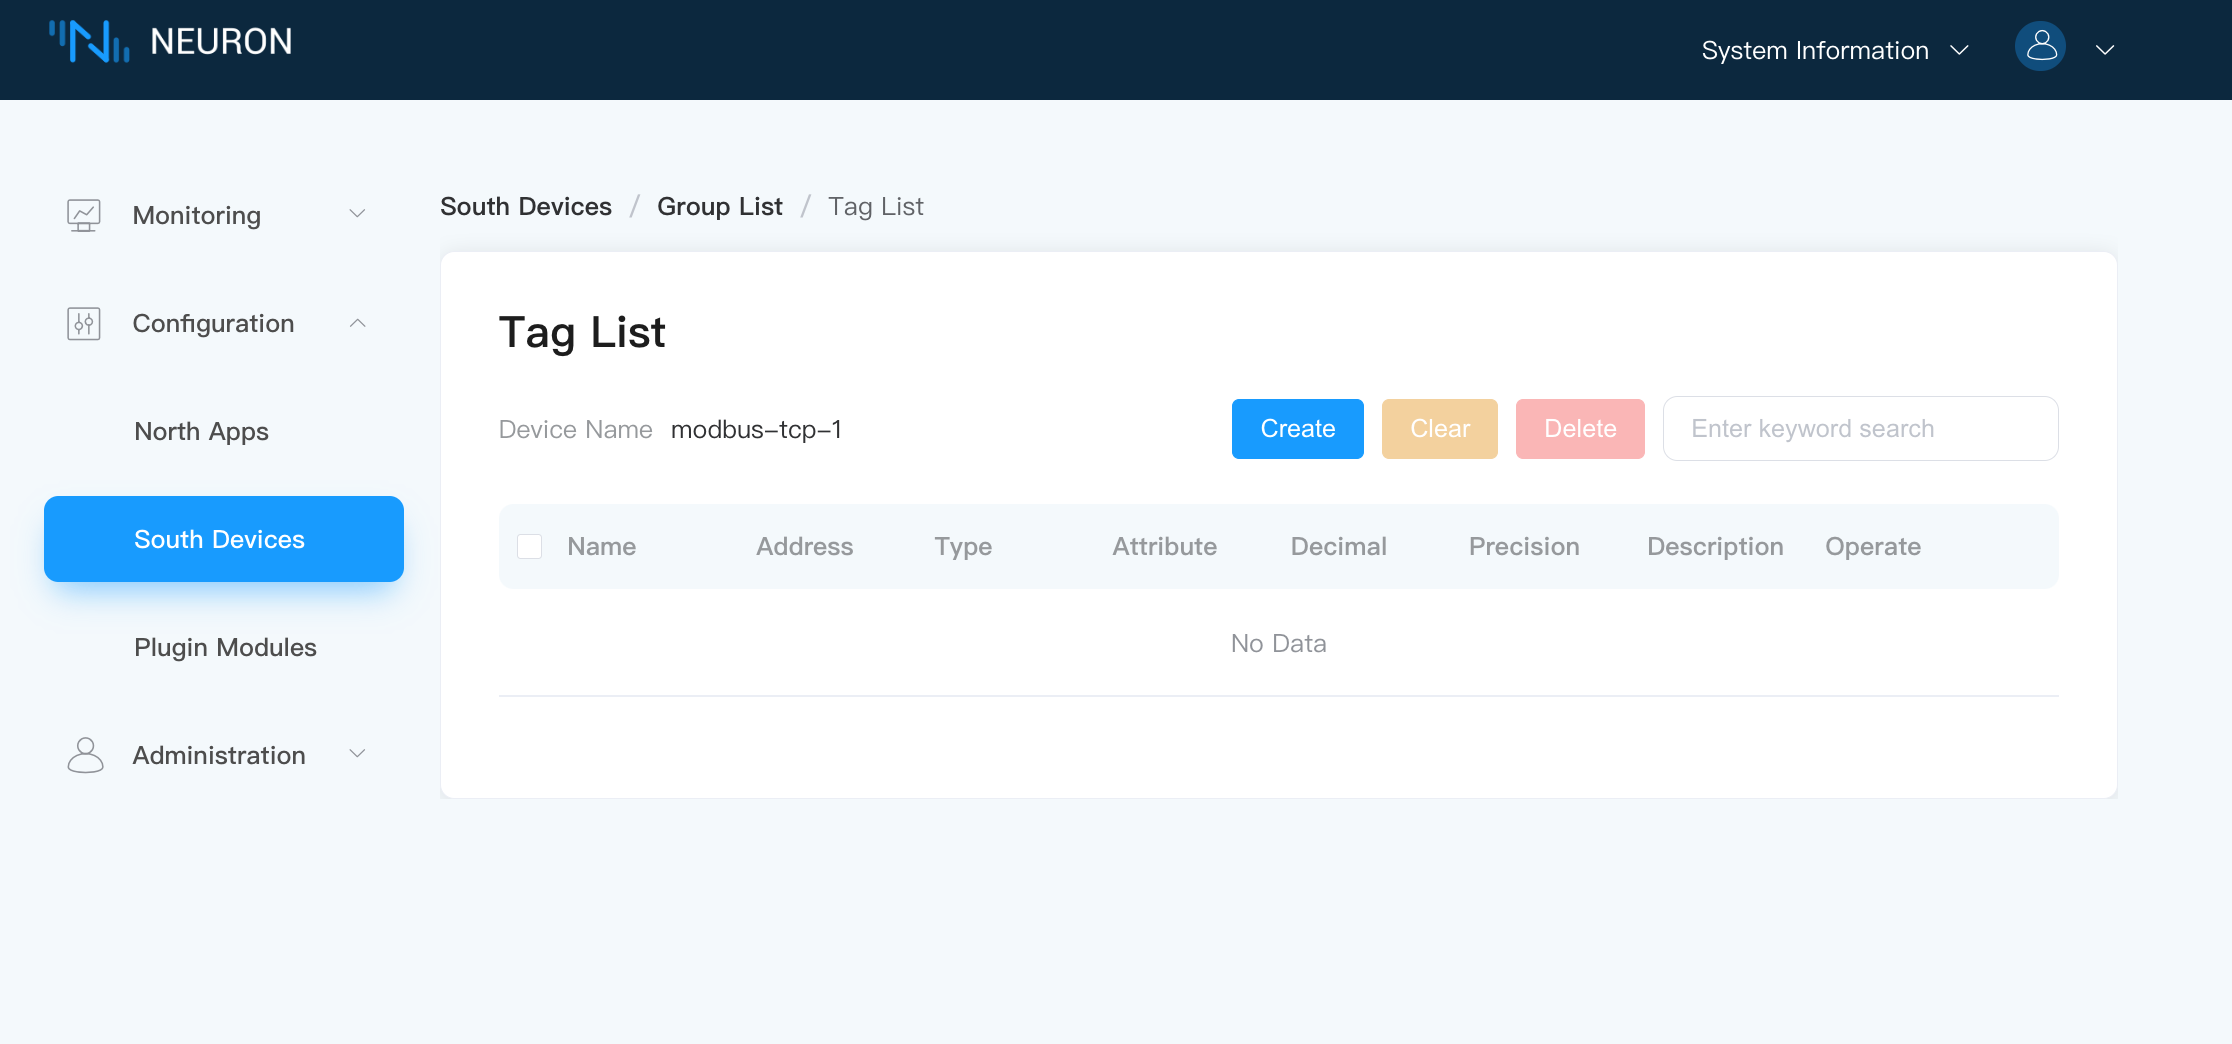
Select the Create button to enter the tag page.
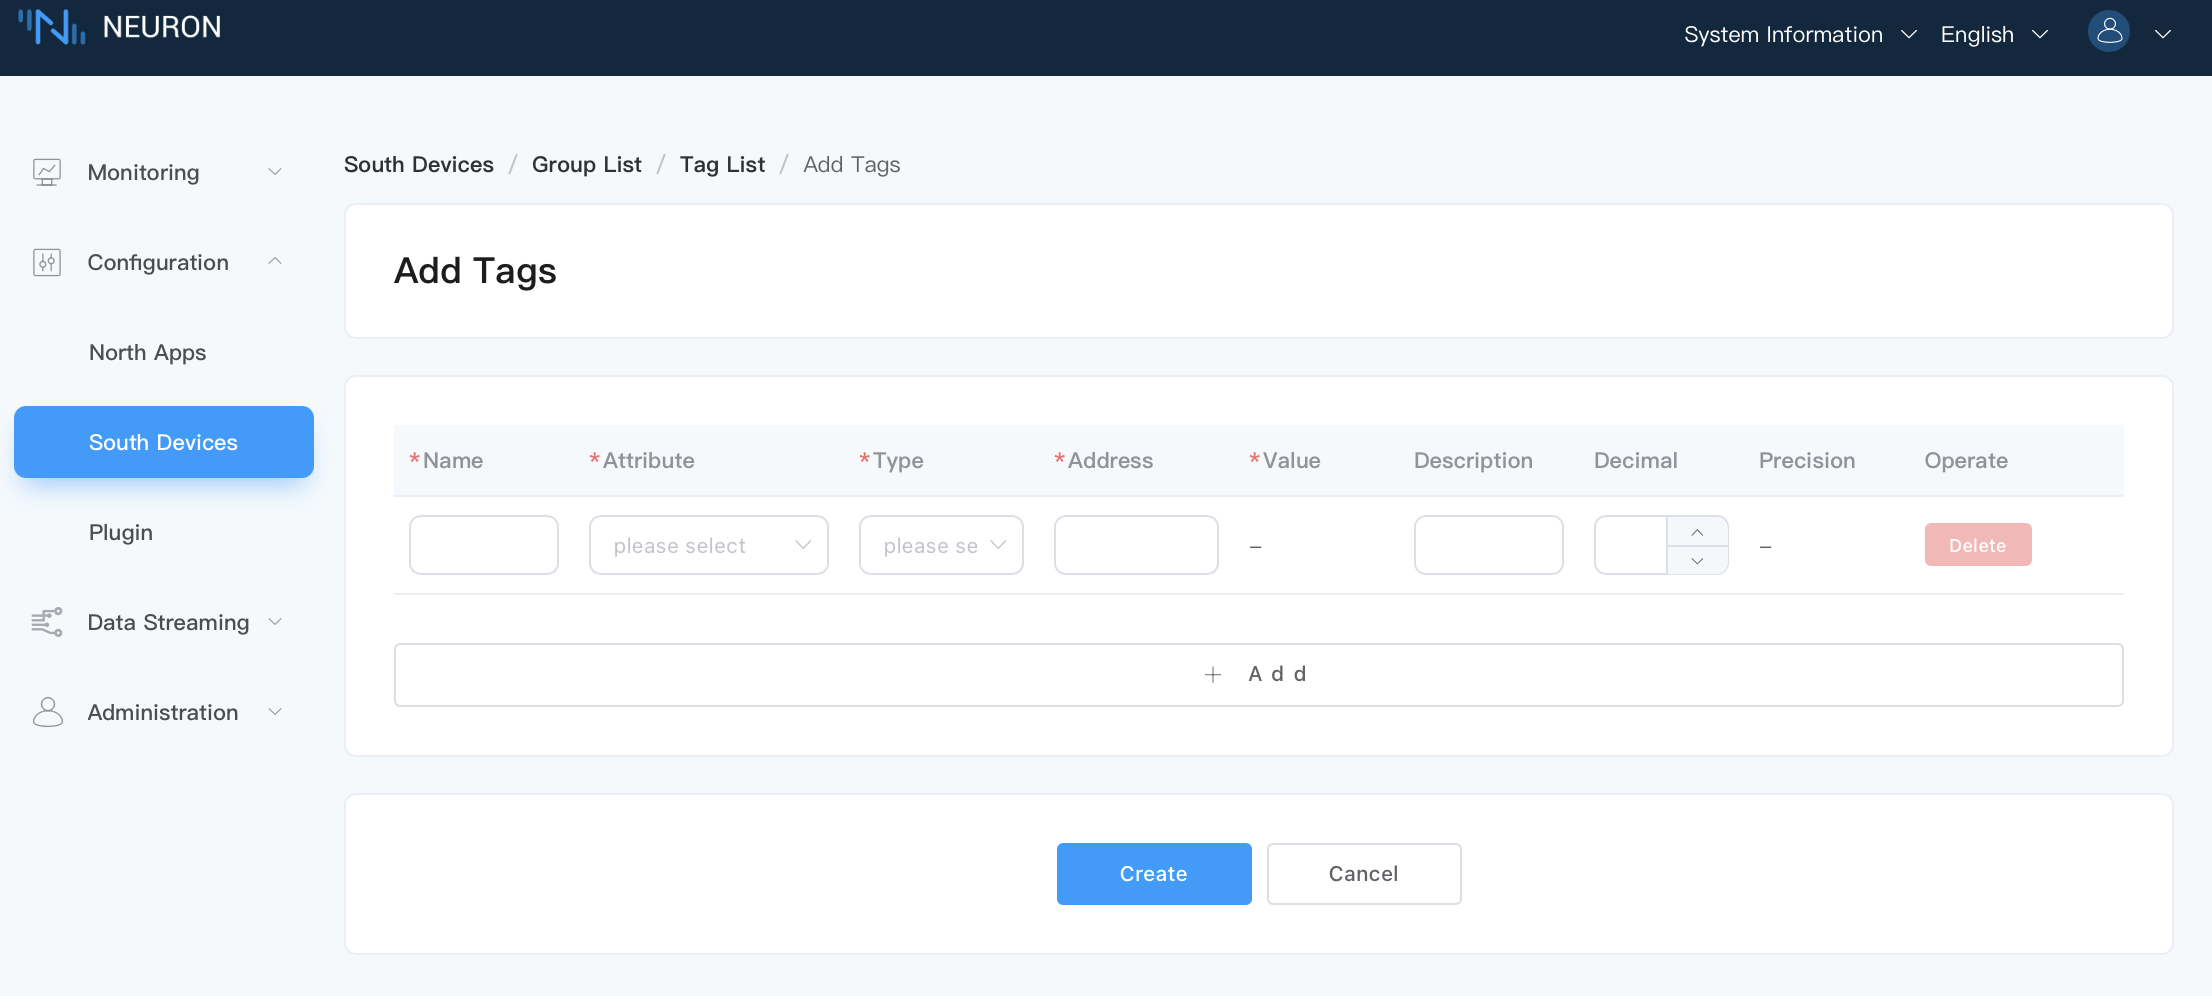
Manually create a tag for a group:
- Name: Fill in the tag name, for example, tag1.
- Attribute: Select the tag attribute from the drop-down list, for example, read, write, or subscribe.
- Type: Select data type from the drop-down list, for example, int16.
- Address: fill in the drive address, for example, 1!40001, where 1 stands for the tag salve id setted in Modbus simulator, and 40001 stands for the tag register address. Please refer to Module Setting for detailed instructions on driving address.
- Click the Create button to complete the creation of the tag;
TIP
For more tag operations, please refer to Advanced Operations at the end of the document.
After the tag is created, the working status of the equipment card is running, and the connection status should be Connected. If the connection status is still Disconnected at this time, please execute the following instructions at the terminal of the Neuron running environment to confirm whether the Neuron running environment can access the corresponding IP and port.
$ telnet <Running IP on PC side of Modbus simulator> 502Please confirm whether the IP and Port are set correctly and whether the firewall is closed when configuring the device.
View Collected Data
Click Monitoring -> Data Monitoring to enter the data monitoring interface to view the values read by the created tags, as shown in the figure below.
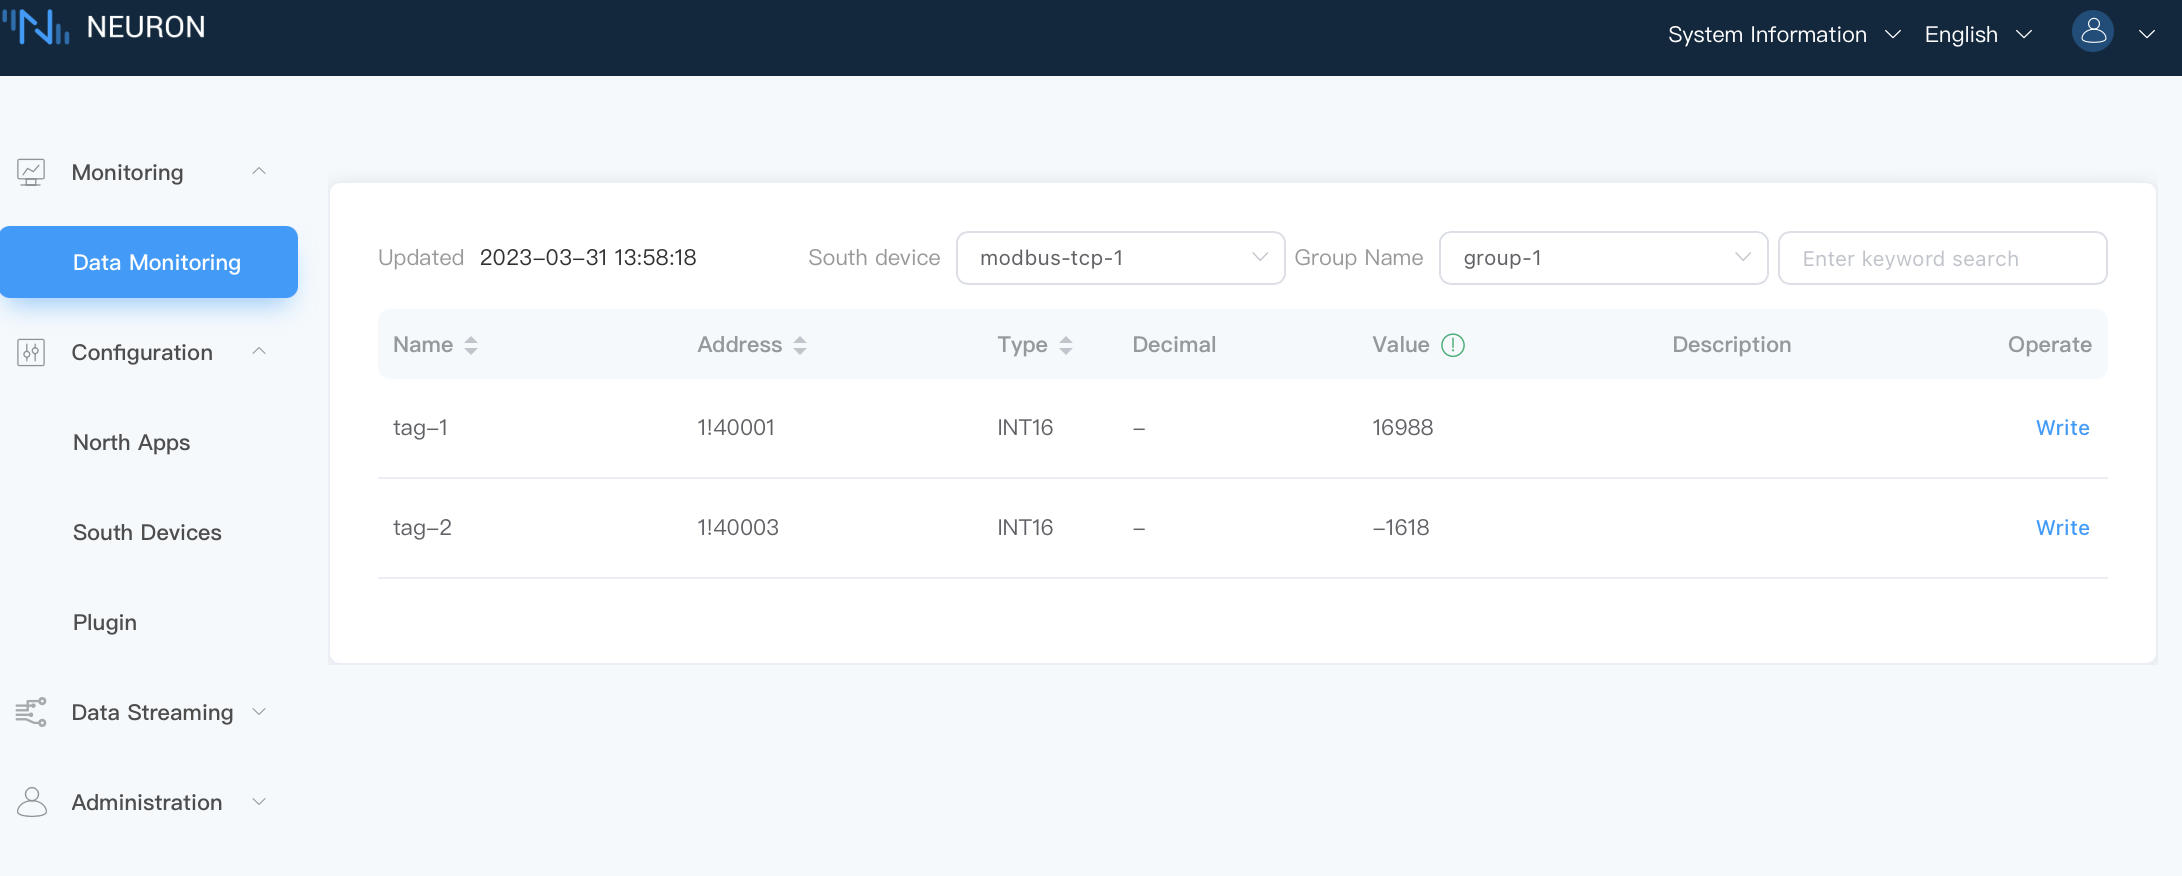
Data monitoring displays values in groups, you can group the devices by device or groups:
- South device: select the southbound device you want to view from the drop-down box, for example, select modbus-tcp-1 that has been created in the above steps;
- Group Name: select the group under the selected southbound device from the drop-down box, for example, select Group-1 that has been created in the above steps;
- Select Finish, and the page will show the value of each tag read under the group;
Add A Northbound Application
In Neuron, northbound refers to the connection between Neuron and MQTT broker. . This step illustrates how to create a southbound device.
Select North Apps in the Configuration menu, and click the Add Application buttton to add an application, as shown in the following figure.
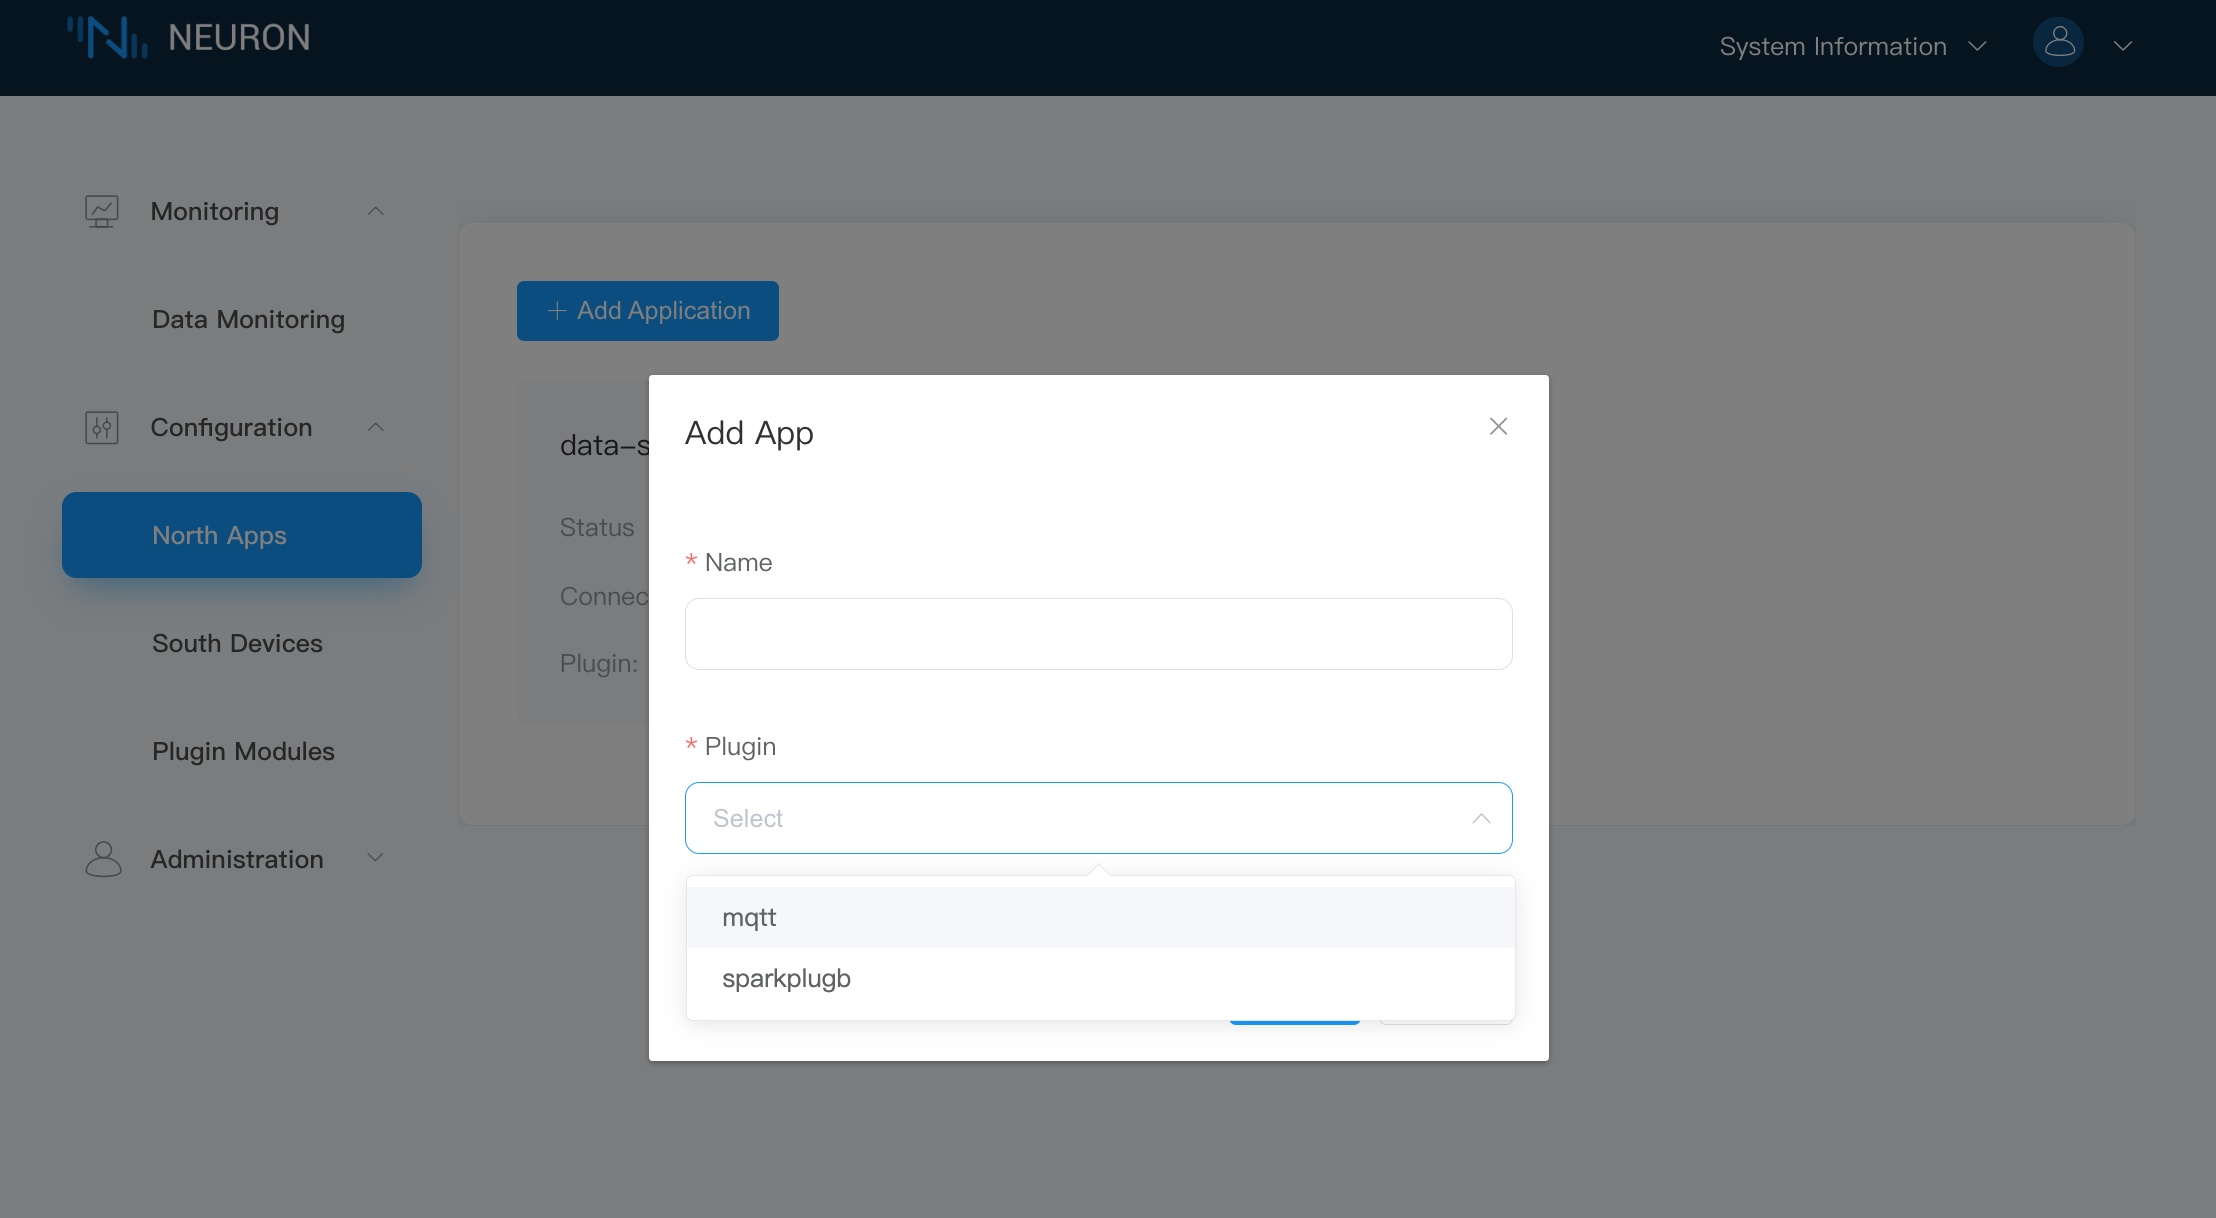
Add an MQTT cloud connection module:
- Name: Fill in the application name, for example, mqtt;
- Plugin: Select the plugin of mqtt from the drop-down list;
- Click the Create icon to add an application.
Establish the Connection
Configure the parameters required for Neuron to establish a connection with the northbound application.
Click the Application Configuration icon on the application card to enter the application configuration interface, as shown in the figure below.
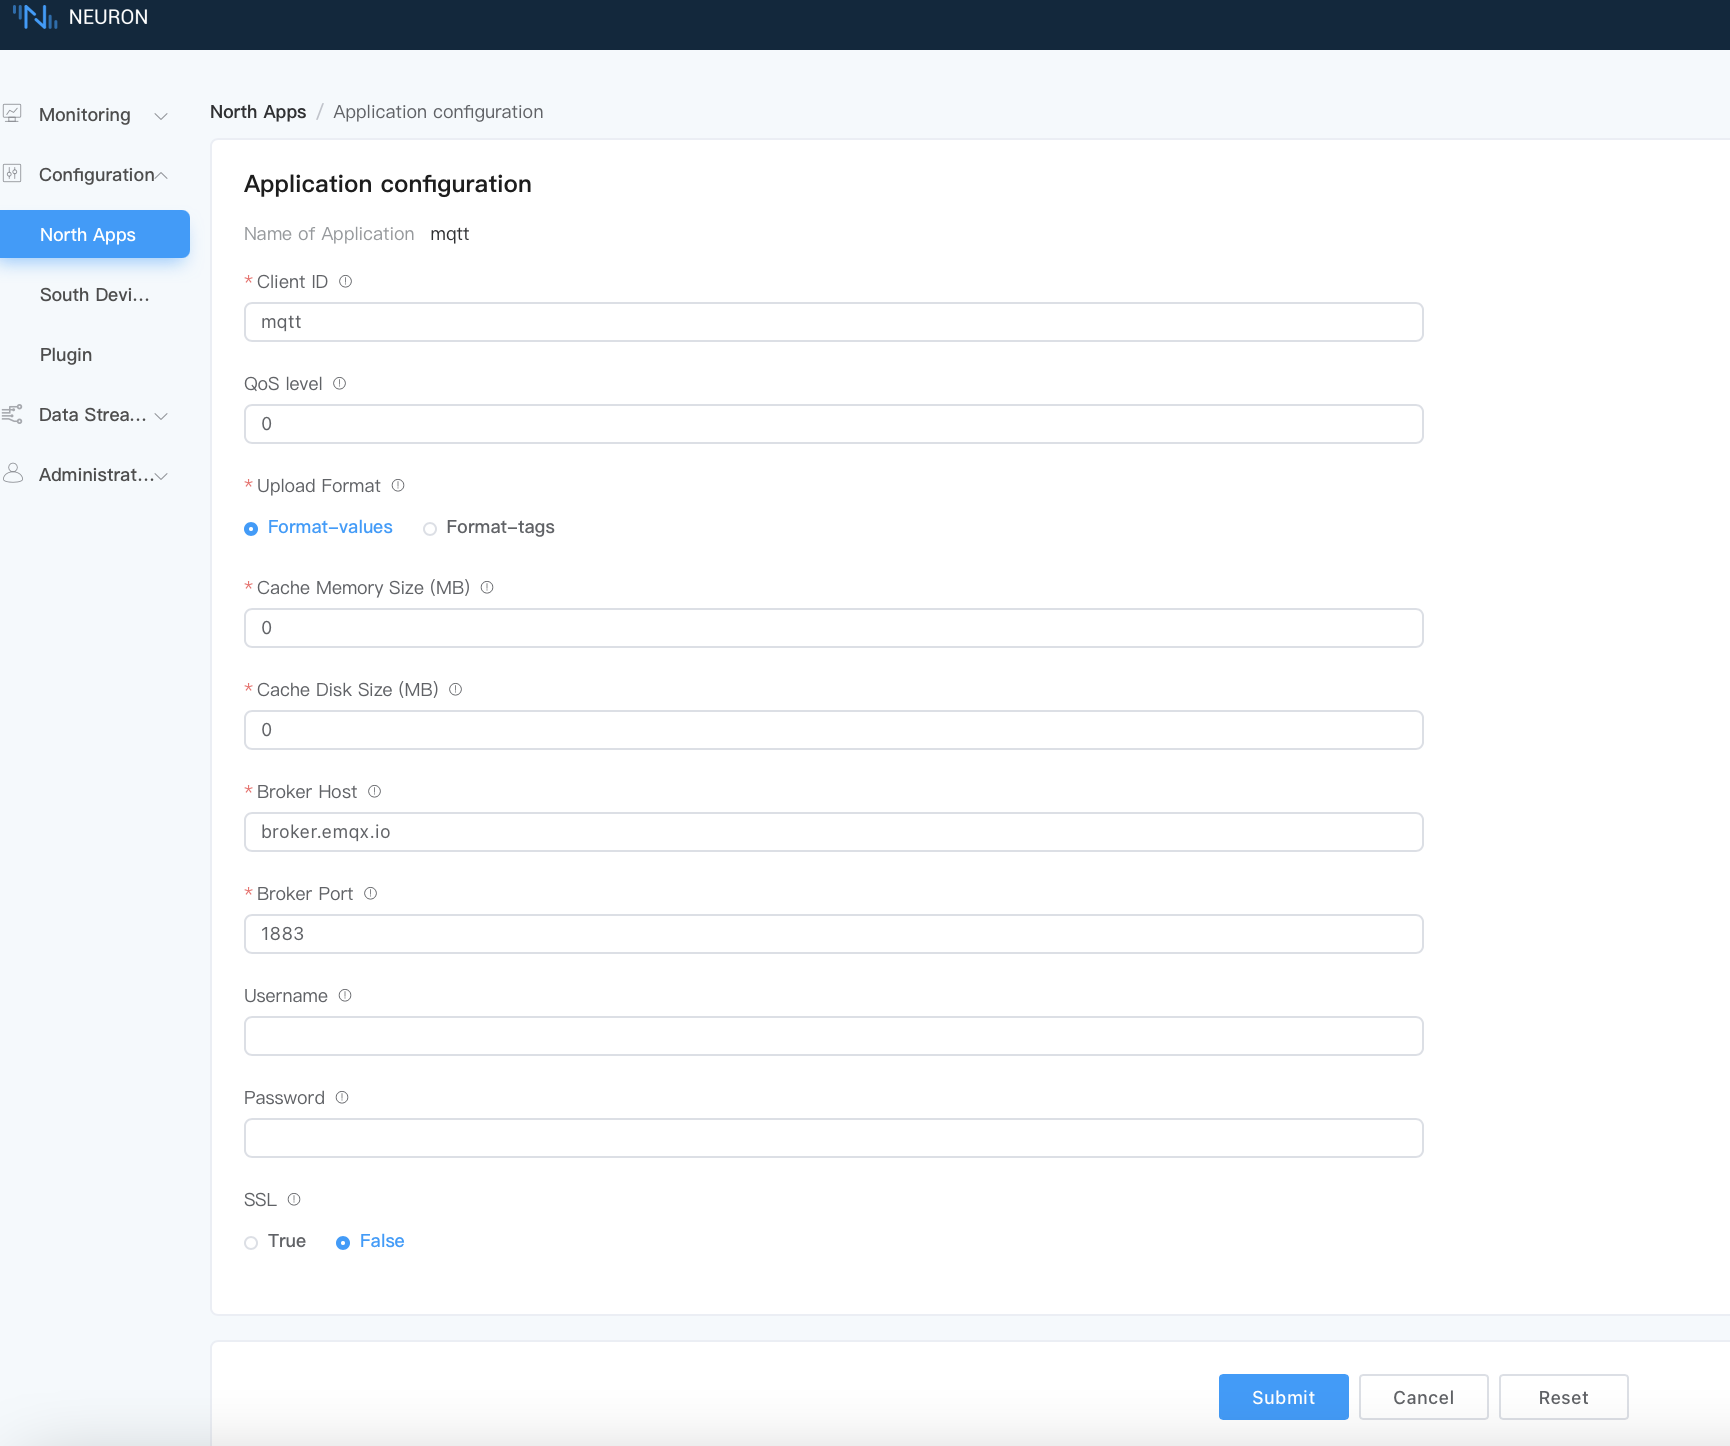
Set MQTT connection:
- Upload topic: Use the default escalation topic (/neuron/mqtt/upload).
- Host: Use the default public EMQX Broker (broker.emqx.io).
- For the rest fields, you can keep the default settings.
- Click Submit to complete the configuration of northbound application, and the application card will automatically enter the working state of Running.
Subscribe to Southbound Group
The collected data are uploaded to the cloud in groups, and users need to choose which groups of data to upload.
Click any blank space in the application node card to enter the Group List page, and click the Add Subscription icon in the upper right corner to add a subscription, as shown in the following figure.
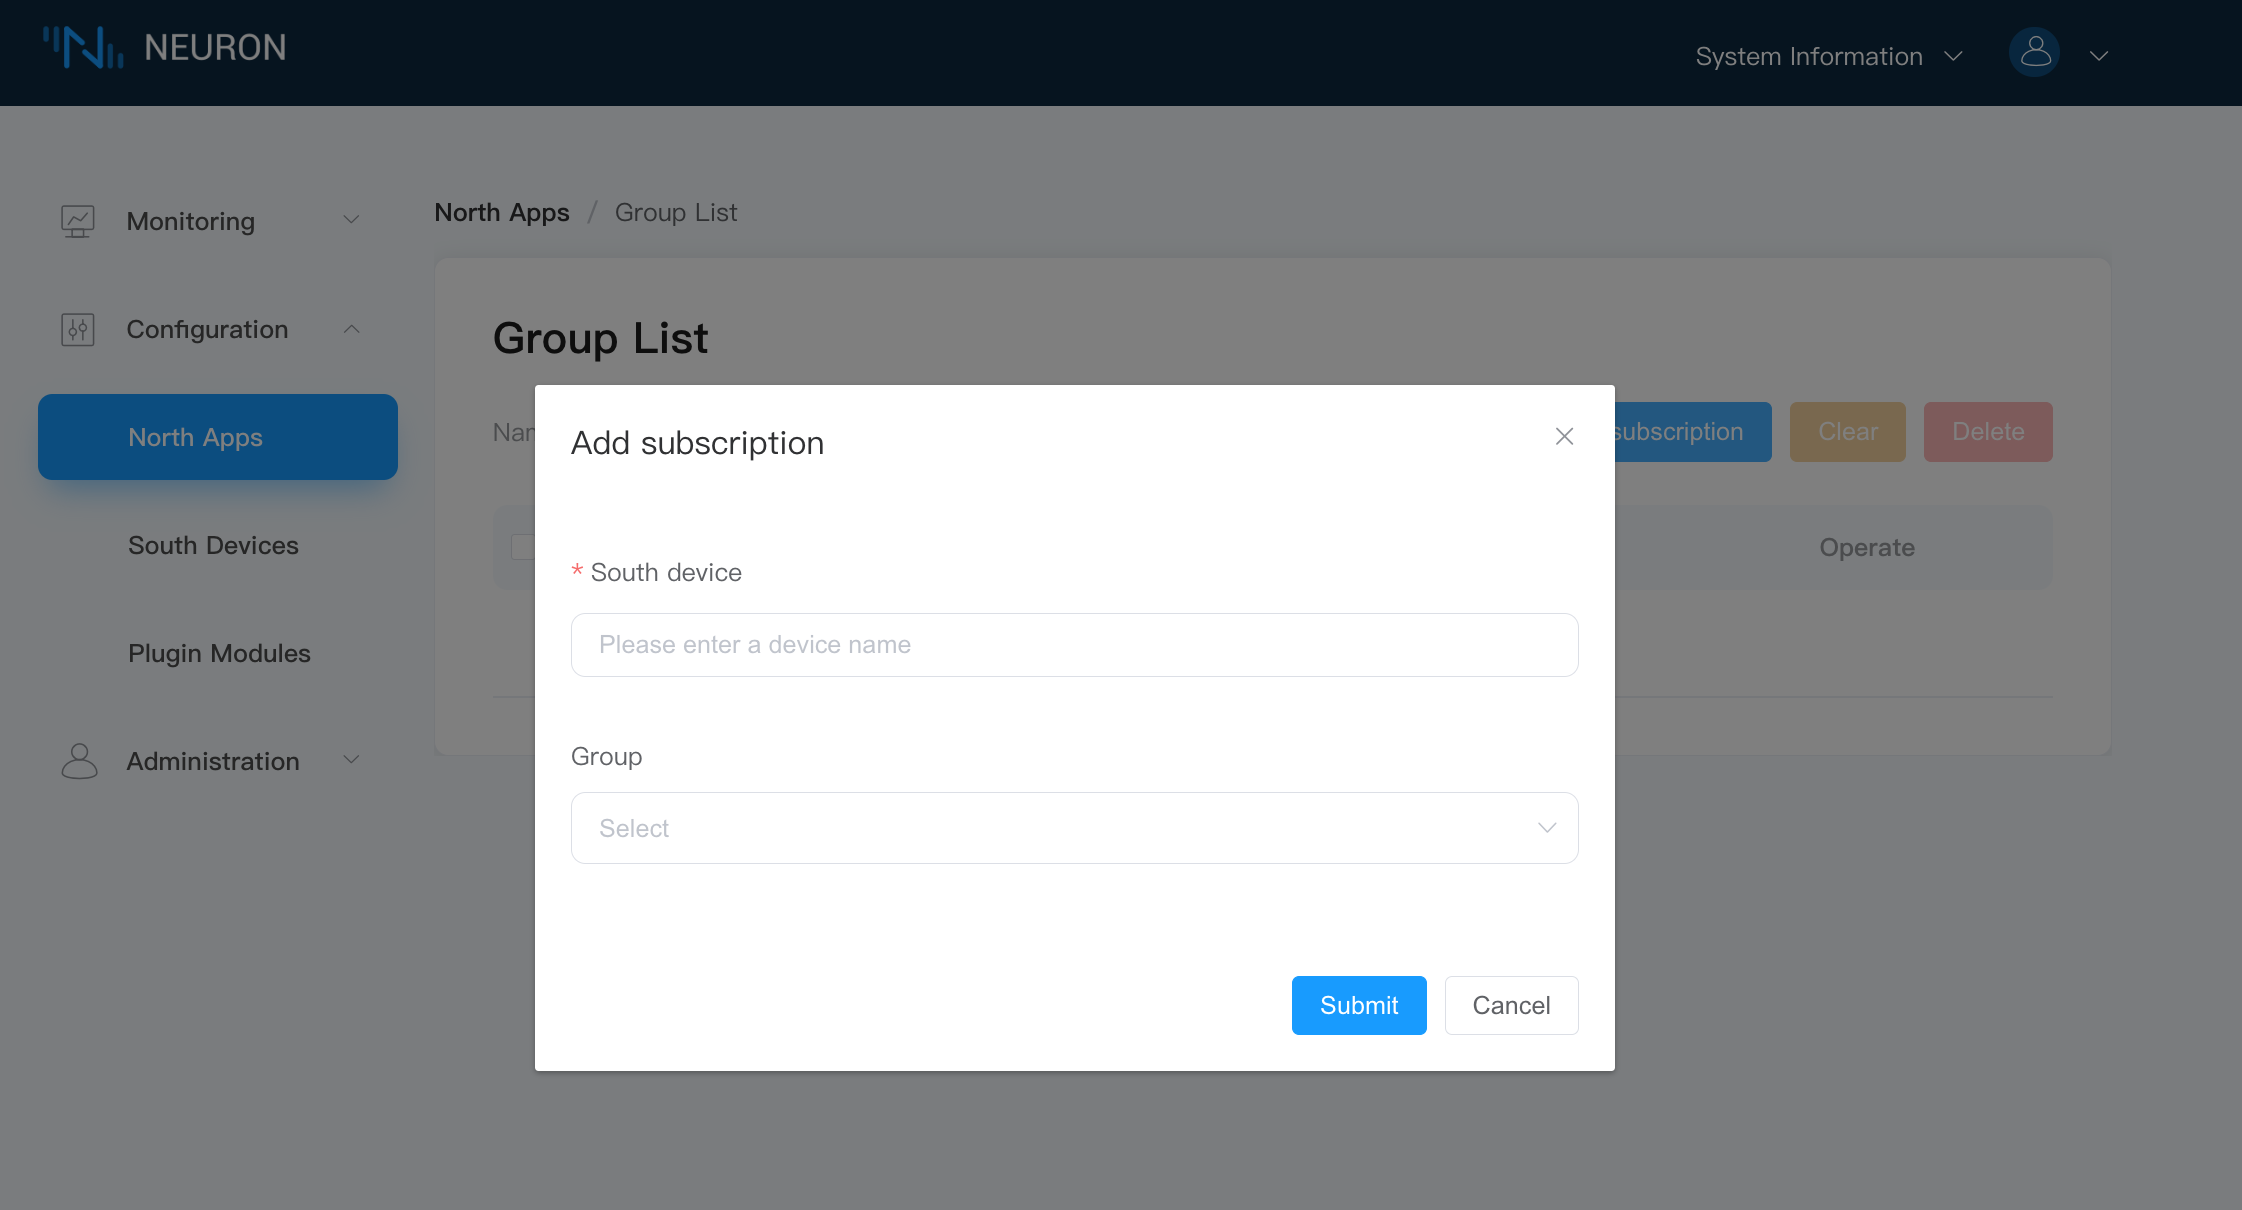
Subscribe to the data group of the southbound device:
- South device: Select the southbound device that has been created from the drop-down box, for example, modbus-tcp-1;
- Group: Click the drop-down box to select the group you want to subscribe to, for example, group-1;
- Click Submit to complete the subscription.
View Data with MQTT Client
After the subscription is completed, users can use the MQTT client (MQTX is recommended and can be downloaded from official website to connect to the public emqx proxy to view the reported data, as shown in the following figure.
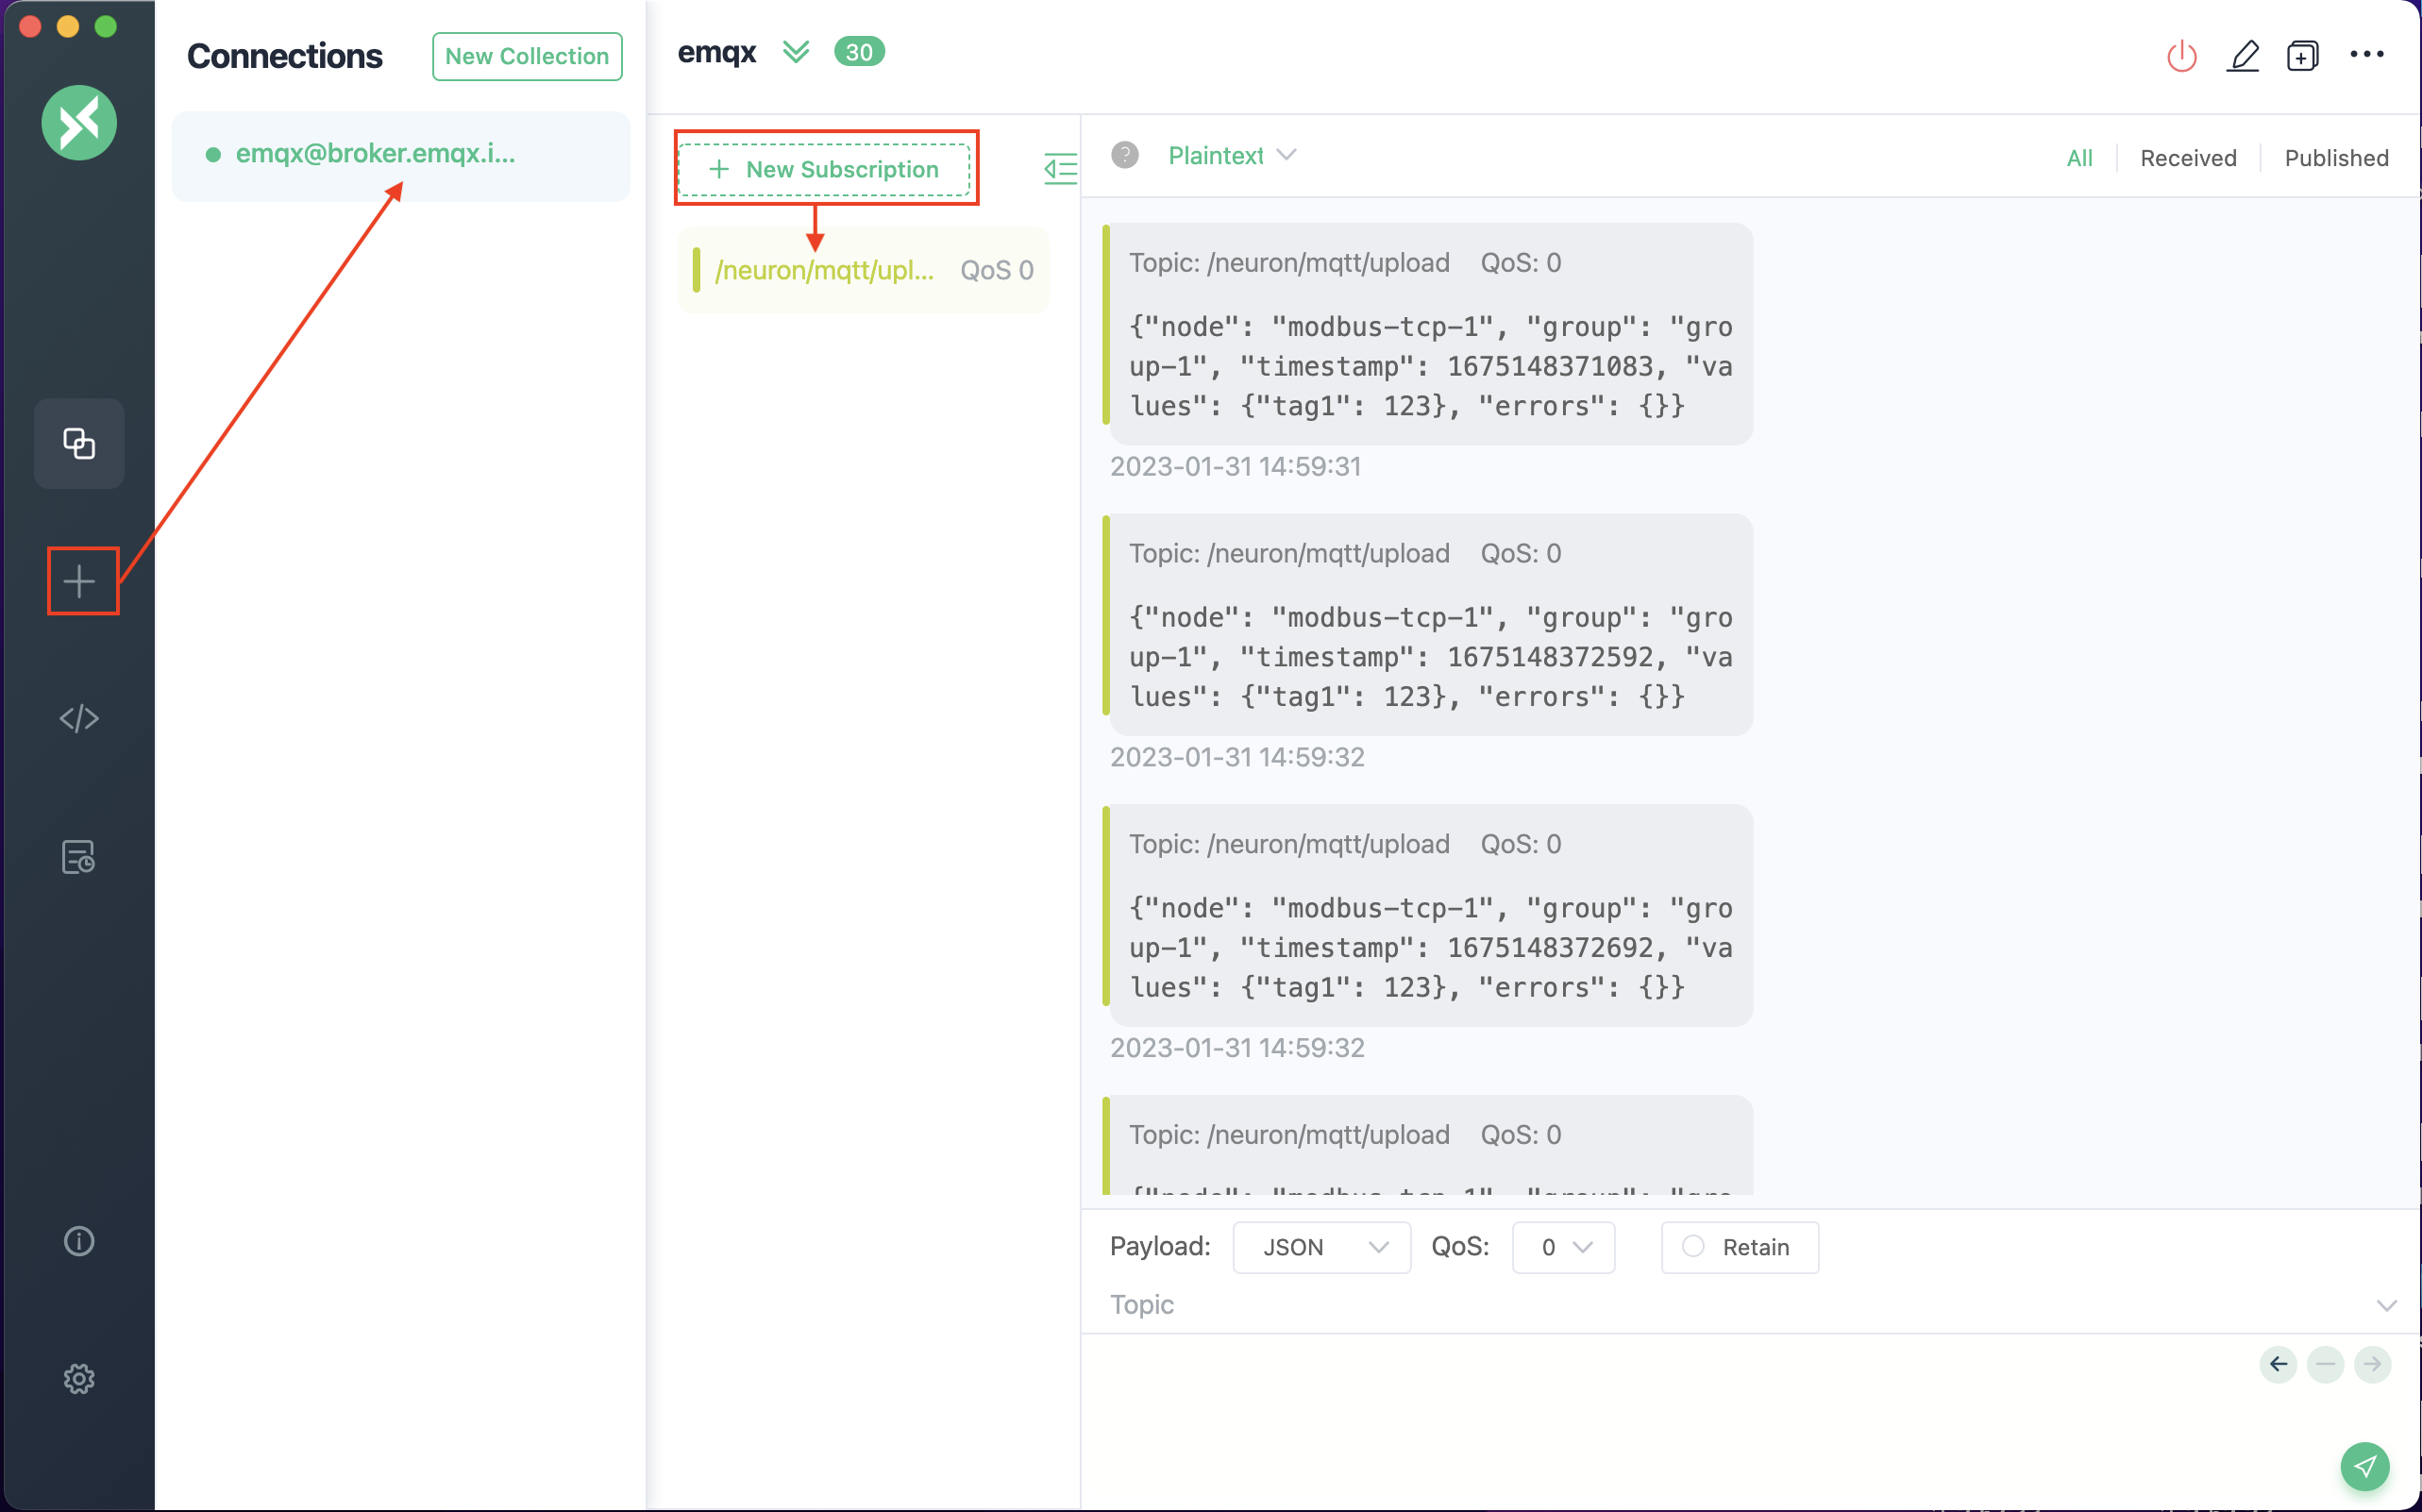
After successful subscription, we can see that MQTT X can directly receive the data collected and reported by Neuron.
- Ppen MQTT X to add a new connection, correctly fill in the name and the Host and Port of the public EMQX Broker, and complete the connection;
- Add a new subscription, and the Topic should be consistent with the Upload topic in the applicatin configuration step, for example,
/neuron/mqtt/upload.
TIP
The default topic format for uploading topic is /neuron/{node_name}/upload, where {node_name} is the name of the created northbound application. Users can also customize the reporting theme.